Montessori Language Development with Toddlers

Language Development with Toddler

Today I want to share a Montessori-inspired language activity on our shelves that my one-year-old absolutely LOVES. It’s the perfect activity for toddler language development. It’s simple, no-mess, fun, and effective!

If you’re interested in learning about the Montessori language materials for the 3 to 6 age-group, you’ll definitely want to check out my post, How to Teach Your Child to Read the Montessori Way.

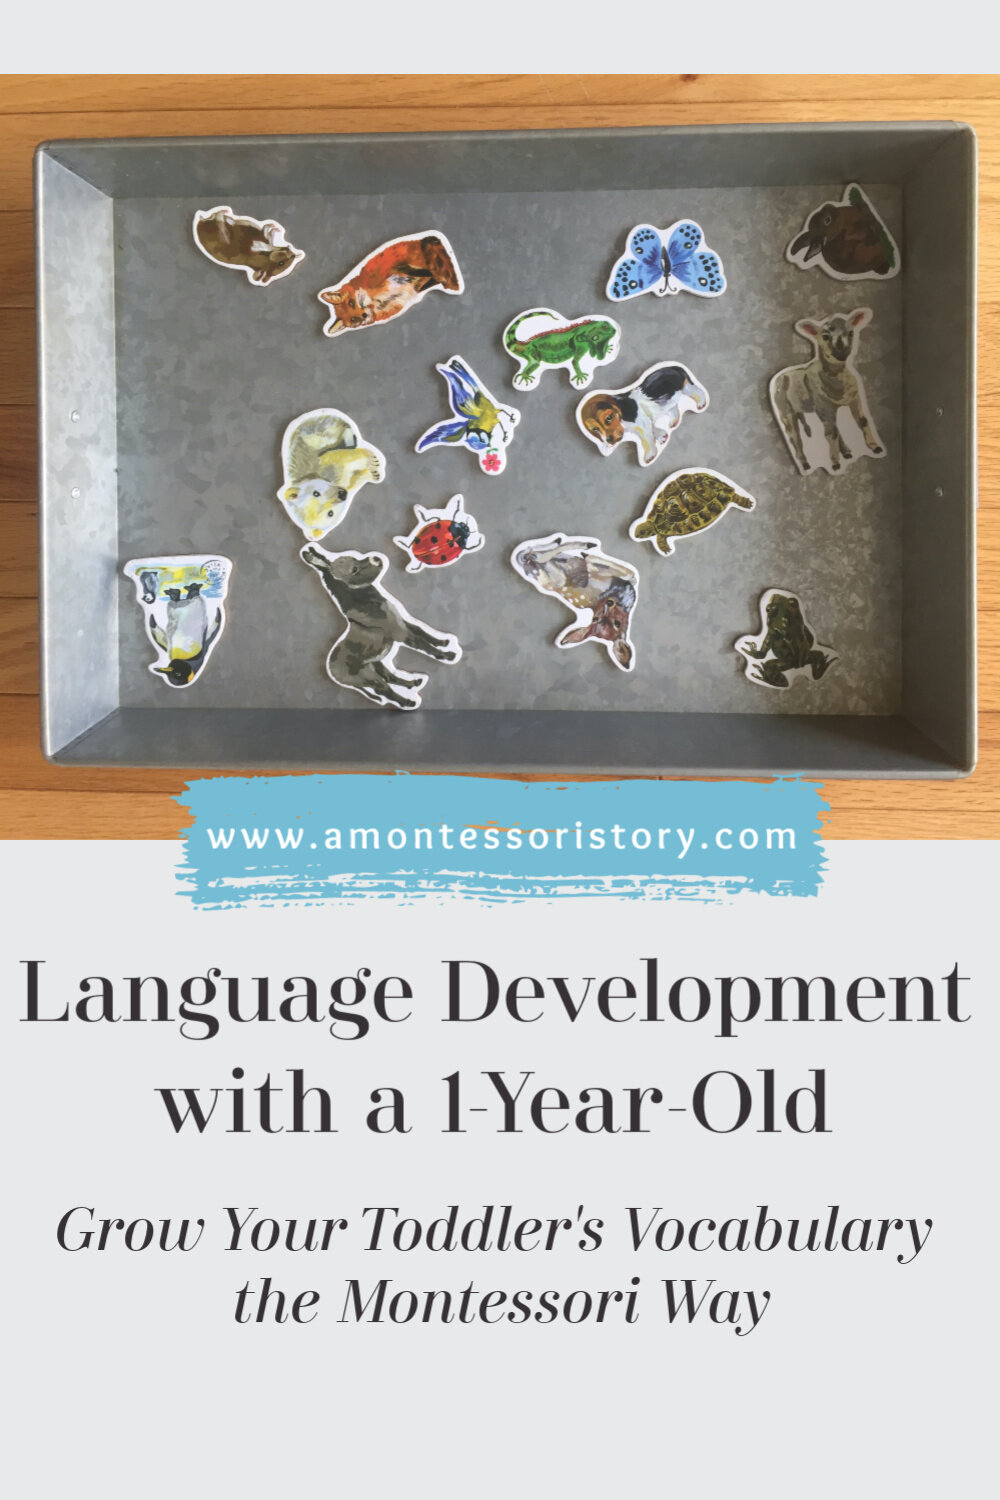
For his 1st birthday, I bought Oliver a set of wooden animal magnets. I love this particular set (beautifully designed by Nathalie Lété) because they are painted to look realistic instead of cartoonish. This is an important part of the Montessori philosophy–children need to first be introduced to realistic images instead of cartoonish or abstract images in order to have a good understanding of what the image actually represents. There is a great post about the reasons for using beautiful and realistic images over at How We Montessori. The fun cartoon images can come later!

I found a large, galvanized tray to keep the magnets on. Another great thing about this work is that we don't lose the pieces very often. They stay put on the tray! When I first put this together, I had no idea that it would become one of Oliver's most used and loved "toys."

In the beginning, he loved manipulating the magnets on the tray. I would point and name the animals. One day, my sweet boy repeated the word "donkey." I was awestruck! "He can say donkey! Oliver can say donkey!" It wasn't long before I could say, "Bring me the donkey," and he would do just that. 

So naturally, I wanted to see what would happen if I asked him to bring me other animals. In no time at all, this animal magnet distance game was a household favorite! 

Sometimes, he still confuses some of the animals. When this happens, I will isolate three animals at a time–pointing at and naming them. I think it's also important to note (and you might have noticed in the video), that anytime Oliver brings the wrong animal, I don't make a big deal about him being wrong. Instead, I name the animal that he did bring me, and we continue playing. It's important that he learns that it's okay to make mistakes and that we learn from them.

Isolating three animals at a time–bunny rabbit, iguana, ladybug.

Isolating three animals at a time–bunny rabbit, iguana, ladybug.

If possible, I try to show multiple examples of a particular animal in order to reinforce what the images represent. 

This Painting with Picasso board book from the Mini-Masters series has another realistic image of a donkey.

This Painting with Picasso board book from the Mini-Masters series has another realistic image of a donkey.

Once Oliver seems to know all the animals in this set, I plan to change them out for a new set of animals. l also want to try fruits, veggies, shapes, vehicles, etc.

MagnaFun is another brand that makes several great sets of magnets. These Melissa & Doug shape magnets are nice, too.

And of course, it's super important for children to have real-life experiences with animals (or fruits, veggies, etc.) in addition to activities like this. Petting zoos are educational and always great fun with the littles!

What language development activities have you tried? Let me know in the comments. I'm always looking for new inspiration!

Mindfulness in the Classroom with Zentangles

Mindfulness in the Classroom with Zentangles

Today, I want to introduce you to a great way to develop mindfulness in the classroom: Zentangles! 

What is a Zentangle, you ask? Only my new favorite pastime!

In short, it is an artform that is created by combining different patterns and designs to create unique images. 

No two Zentangles are the same, but each is beautiful in its own way. I have known about Zentangles for a while now and have been itching to try it out for myself.

So, I finally ordered the most basic supplies on Amazon to get started. I used the Studio Series Art Tiles and a Sakura Micron Pen set in black ink. I got started with One Zentangle a Day, a book with step-by-step pattern instructions and lots of inspiration.

After completing my own Zentangles, I knew I had to incorporate them into the classroom! This work is perfect for elementary-aged students. It is not only fun, but it develops mindfulness. You may or may not know this about me, but I am always on the lookout for new ways to promote mindfulness in the classroom! 

Why? Because mindfulness is a practical life skill. It allows us to be aware of our surroundings; it allows us to enjoy the present moment; it allows us to acknowledge our feelings and emotions. Practicing mindfulness increases focus and reduces stress. In the classroom, mindfulness can help students concentrate on their work and enjoy their learning! If you haven't already, I encourage you to read more about mindfulness in the classroom. There is some promising research in the works!

As Zentangles are drawn in pen, there is no erasing. This should be a quiet and meditative work, because concentration and focus are encouraged when drawing the intricate and detailed designs. Zentangles also teach students that it's okay to make mistakes. Something beautiful can always come from mistakes made along the way! 

On top of that, Zentangles can combine the Elements of Art. Most notably, lines, but also color, space, perspective, and even form. This makes Zentangles the perfect follow-up work to your art lessons!

For an elementary Montessori prepared environment, this work could be placed on the art shelf or on the peace shelf, depending on how you intend it to be used. Your set-up would include a tray that holds a limited number of tiles, a few micron pens to choose from, and three or four simple step-by-step pattern examples. You could also include photos of Zentangles done by others for inspiration!

A lovely mix of student work and my own.

A lovely mix of student work and my own.

For further work with Zentangles, students might try incorporating colored pencils, watercolors, or even ultra-fine point, colored Sharpies into their artwork. As students learn new patterns and designs, they begin to feel more confident in including Zentangles into other artforms as well. I've seen a student draw a self-portrait with a background of Zentangles. I've had students make Zentangle magnets. I've even seen Zentangle bookmarks! The creativity and possibilities are truly boundless. 

If you are interested in making your own Zentangles or introducing them to your students, here are some other great resources to get you started:

Have you tried Zen Tangles with students in the classroom? Share your experiences and ideas in the comments!

Coding for Kids: Code.org in the Montessori Classroom

Hands-on Coding

In case you didn't already know, I love the Montessori approach to education. I love the beautiful materials, the hands-on work, and the mixed-age classrooms. Most of all, I love following the interests of the child.

 In fact, this year I've decided to step outside my comfort zone that is the typical Montessori curriculum in order to "follow the child." 

Several of my students have expressed a keen interest in learning to code. And admittedly, computer programming is not an area of expertise for me. However, I always want to do what I can to foster the interests and curiosities of my students. 

And so, earlier in the year I went to a code.org workshop to learn about their coding curriculum. I discovered that–in many ways–it works really well with the Montessori philosophy of education. You can read more of my thoughts on that here, but the gist of it is that the code.org curriculum includes quite a lot of hands-on activities that come before the more abstract computer work.

Thus far, we've done two hands-on, "unplugged" activities, both of which proved to be educational and engaging at the same time. My students are already asking for more coding lessons!

The first activity was called Graph Paper Programming. Much like a typical Montessori lesson, I started by introducing new vocabulary to the students:

  • algorithm- a list of steps you can follow to finish a task

  • program- an algorithm that has been coded into something that can be run by a machine

The students went on to create programs on graph paper grids that their friends could decipher by acting as the "machine." They started this process on small 4 x 4 graph paper grids.

At the end of the lesson, I challenged them to create their own design on a large piece of graph paper, write a code for it, and see if their friends could reproduce the design by following their code. They worked diligently on these designs & codes over the next week. Here are the results:

For the 2nd "unplugged" activity, Real Life Algorithms, I challenged them to write out algorithms (or a list of steps) for daily tasks such as making a PB&J sandwich, dusting the geography shelf in classroom, or planting a flower. The idea behind this activity is to understand that a program won't work properly–or at all–if the algorithm is not in logical order or if it missing a step in the process.

Then came the real fun. They cut out the pieces on this worksheet, put the steps in a logical order, and got to make & fly paper airplanes following the algorithms they pieced together.

These "unplugged" activities are great for exploring basic programming concepts. And now I am excited to try out our first coding lesson on the computer this week! Updates to follow!

If you'd like to try out one of the code.org courses in your classroom (or homeschool), their curriculum is available online here, and it's completely free!

I'd love to hear any feedback from others who have tried code.org OR any other coding curriculum. What works for your students? Let's share ideas!

Positive Phrasing: Being Mindful of How We Speak to Children

Positive Phrasing

During my time at Montessori Northwest, Primary Director of Training, Ginni Sackett, shared with us elementary teachers-to-be about the impact our words have on children. She spoke about the importance of Positive Phrasing, and as a first year teacher, I find it helpful to revisit this topic often.

It is so true that in the classroom, my words often set the tone for the day. The children feed off my energy—be it good or bad. This is why I try to greet my students with a kind smile and an excited demeanor every single morning. 

But being mindful of my words throughout the entire day (WHAT I say and HOW I say it) takes practice, to say the least.

Seriously, have you ever stopped to think about how many times in a single day adults say “no” or "don't" to children? These words are inherently negative, yet they sneak right into our words much more often than we intend. 

“Don't run in the classroom!”

“No talking in the hallway!”

“No dessert until you’ve eaten your vegetables!”

These are common examples of negative phrasing—telling children what we DON’T want.

Let’s just stop right here and try to imagine how we, as adults, would feel if we were told “no” so many times throughout the day.

“Don't talk so loudly.”

“Don't drive so fast!"

“You really shouldn't stay up so late checking emails."

How would you feel—frustrated? Uninspired? Insecure? Sure. All of the above.

Negativity begets negativity. Always. 

And, there really are nicer ways to make a point. If we are thoughtful enough not to speak to other adults in such a negative manner, shouldn't we offer that same respect to children?

Another approach? Let's not be ambiguous by telling children what we DON'T want. Instead, let's clearly & precisely set our expectations by telling children what we DO want. 

“We walk in the classroom. We can run when we are outside.”

“Let’s remember to walk quietly through the hallway.”

“After we eat our vegetables, we can have dessert.”

Positive phrasing reinforces positive behaviors. Simple, but affective.

Words are our most powerful tools of communication. And like any superhero knows, power can be used for good or for evil. Our words can be positive or they can be negative.

And our children learn from us! So let's model how to speak to others in a positive and encouraging manner.

As I said before, being mindful of how we speak to children (and to other adults) all day, every day takes practice. It is an art, developed over time. Consistency is key in developing a new & positive behavior. 

Many thanks to Ginni Sackett for introducing me to Positive Phrasing.

 For more on being mindful of how we speak to children check out:

Leaf Classification and Leaf Art

Leaf Class.jpg

Botany studies are such a fun part of the Montessori elementary curriculum!

I've been going through the Montessori leaf classification lessons lately. I'm also delving into some fine arts work focusing on the elements of design. My students will start out by examining different artists' use of lines in their artwork.

And because, Cosmic Education is interdisciplinary, I figured: why not combine art & scientific classification? Thus, I am planning a color resist leaf classification drawing, emphasizing the use of lines to show the venation of the leaves. 

What?! Why does that sound so complicated? It's a super simple activity, really. You have likely done color resist art before. It's when you draw with crayons, and then go over your drawing with watercolor. The crayon wax and the watercolor resist–meaning, they don't mix. 

Instead of regular crayons, we'll be using my Prismacolor Premier colored pencils to draw the outline of the leaves & the veins, then we will fill in the lamina of the leaves with the watercolor pastels. 

My students LOVE to use my special Caran d'Ache watercolor pastels. They aren't cheap (and they are my personal set), so I only bring them out occasionally. Judging by the kids reactions, you'd think they were magic! But if I'm honest, I love them just as much as they do. And for good reason. They are easy to use, and they yield beautiful results. I mean, you really can't go wrong.

You just color with them, as you would with any crayon. Then go back over the color with a wet paintbrush, and watch them turn into watercolor.

And when they have finished their leafy works of art, we'll discuss how they used various kinds of lines to draw the veins in each of the leaves–thick lines, thin lines, curved lines, smudged lines, and so on.

Gradually the time comes when the plant world no longer gives to the child a mere impression of greenery, sprinkled with the brilliancy of other colors, but as he walks around, wherever his eyes rest on a plant, on a leaf, on a flower, he recognizes a friend: ‘Yes, I know you, and all the details about you.’
— Mario Montessori, The Botanical Cards. NAMTA journal vol. 23 no. 2